Html Taking in Image and Uploading Using App Engine
Image Upload With Google Deject Storage and Node.js
In this relatively short tutorial, I'll be showing you how to upload an paradigm to Google Cloud Storage and likewise how you can resize the image.
As developers, one of the things we shouldn't practice is to always store an Image to our database every bit this could open up our application to all sort security vulnerabilities, information technology also eats up unnecessary space in our database since they are stored as a blob file , and finally, it could lead to an increase in the cost of backing upwards data. Solutions to these bug could either exist to Store our images in the file organisation, and create links/pointers to these images in the database but this could be ho-hum when nosotros need to fetch those images. Some other way this problem tin can be solved is to serve our files with a CDN (Content Commitment Network). A Content Delivery network is oft used to accelerate the effectiveness and efficiency of serving contents from a server to the clients by caching them and making them available to the clients as quick as possible. Nevertheless, serving just images with a CDN tin can be very expensive, and the thing is, since CDN tends to thrive by caching contents, you might have uploaded a new image or file but it wouldn't be available to the users until y'all clear the enshroud. The best option is to use an online file storage web service on the cloud.
The Cloud is just a remote server sitting somewhere, where yous tin store your content and access them quickly, easily, deeply, and from anywhere in the globe. 1 of the advantages of using the Cloud is because of how elastic, attainable, and secure it can be. A lot of companies offer these cloud-based services including Tech Giants like Amazon and Google .
In this tutorial, we will be using Google's cloud-based service known equally Google Cloud Platform . Google Cloud platforms offer a range of cloud-based services but the one we are going to be focusing on is going to exist Google Cloud Storage. Google cloud storage is a service on GCP that allows you to shop static files like images and files. The advantage of using this is that instead of storing say an image in your database, yous instead, upload the image to GCS and get a link/url to that file in which y'all can and then shop into your database hence, saving disk infinite in your database and reducing fourth dimension spent in trying to backup your data.
Getting Started
Before nosotros can start uploading images or whatever files, we need to first create an business relationship, to practice so, copy and paste the URL beneath into your browser and click Enter . This takes you lot the Google Cloud platform's website.
https://deject.google.com/storage/ After the folio loads, you should see something similar to what I have below.

Click on the "Become To Console" Button. This takes you the Cloud Console. Which looks something similar to what we have beneath.

You'll observe that I painted a part of the picture, click on that part on your screen. This redirects us to a page where we are being asked to create a projection. Requite information technology a name and click on the create button. This activeness creates a new project for us in which we can associate our GCS project with.
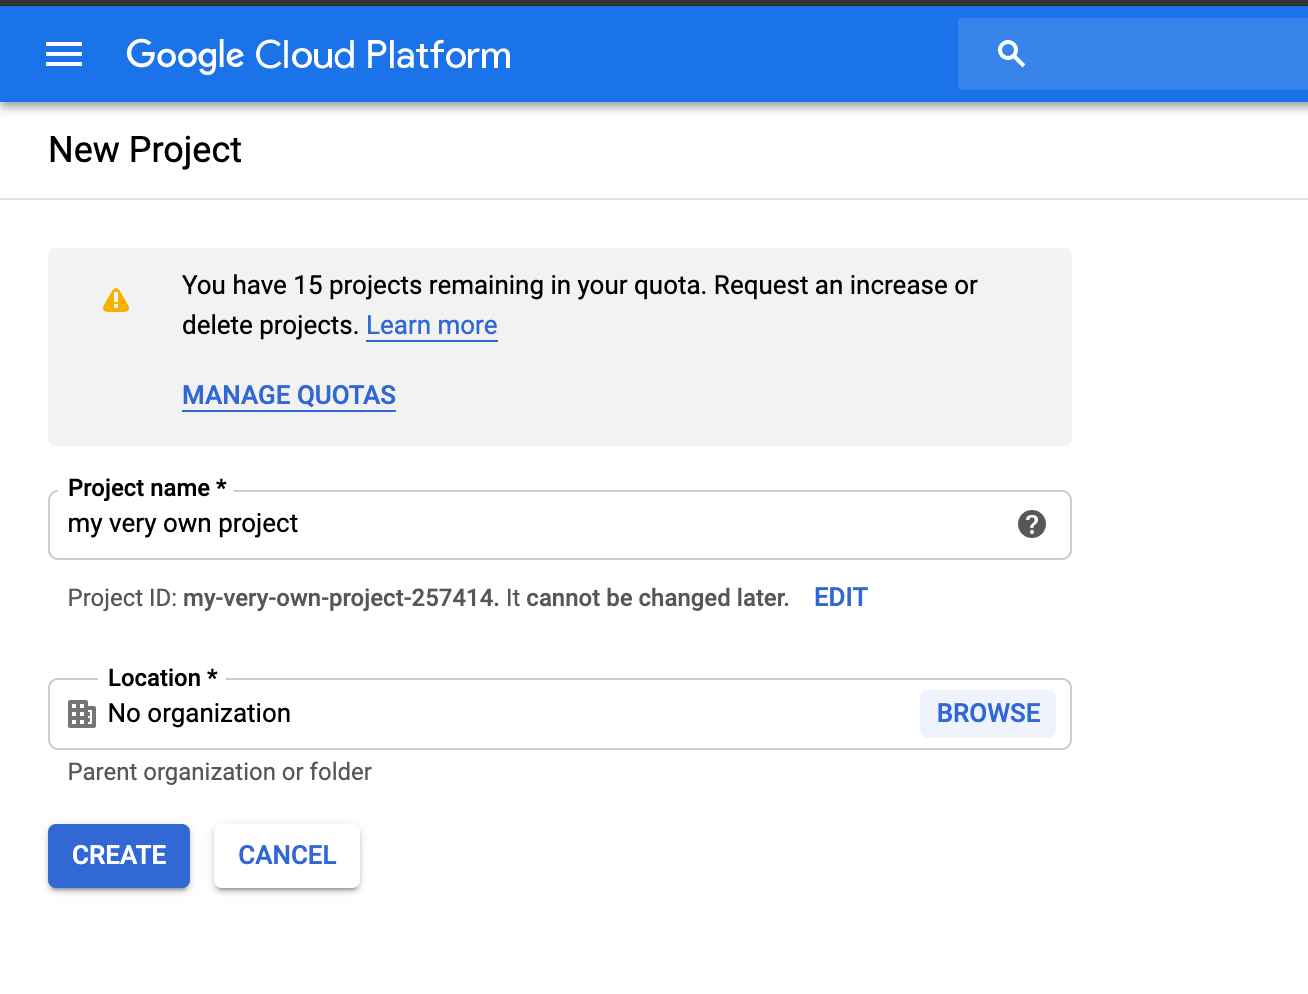
Yours might be fashion dissimilar from mine if information technology's your showtime using GCP.
In the search bar, type Cloud Storage.
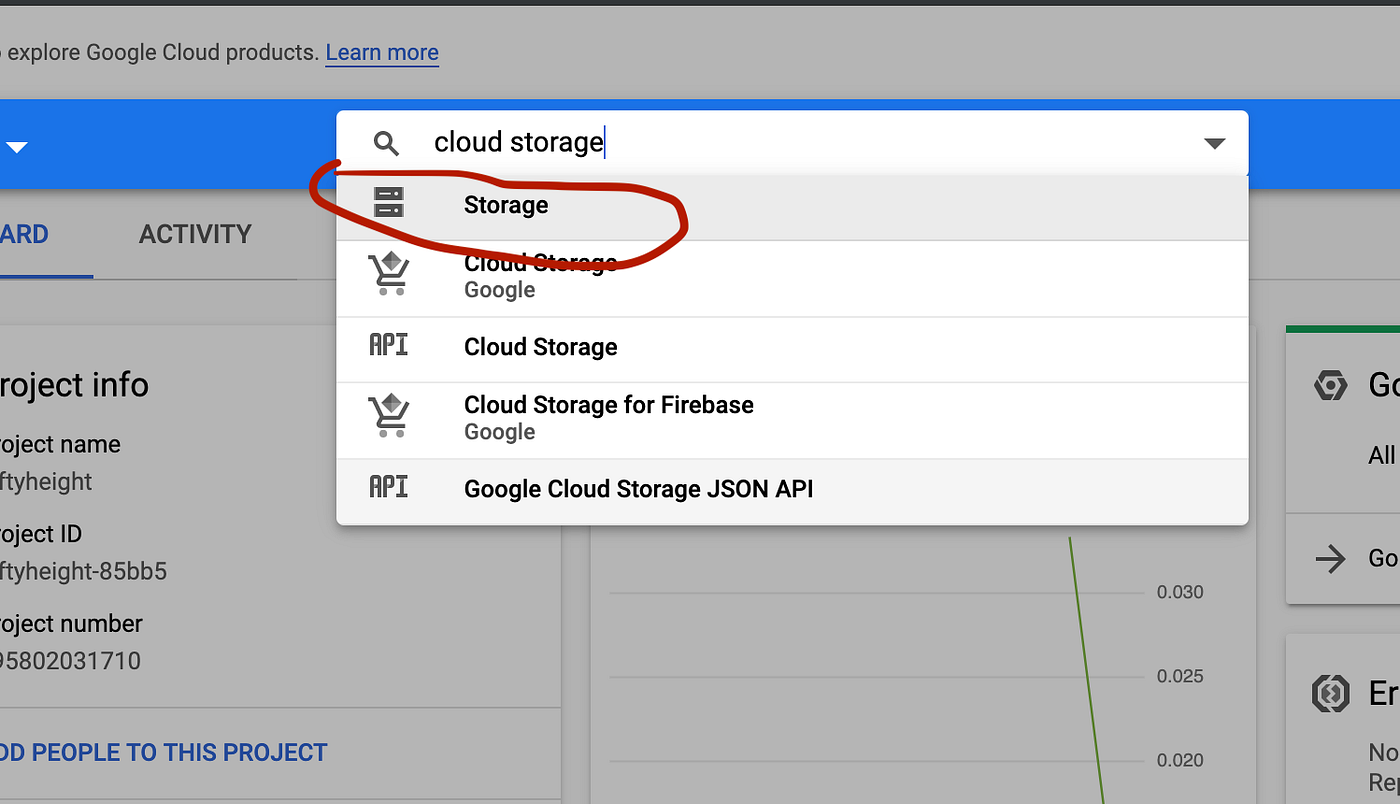
After doing then, you should be redirected to a page similar to what we have below.
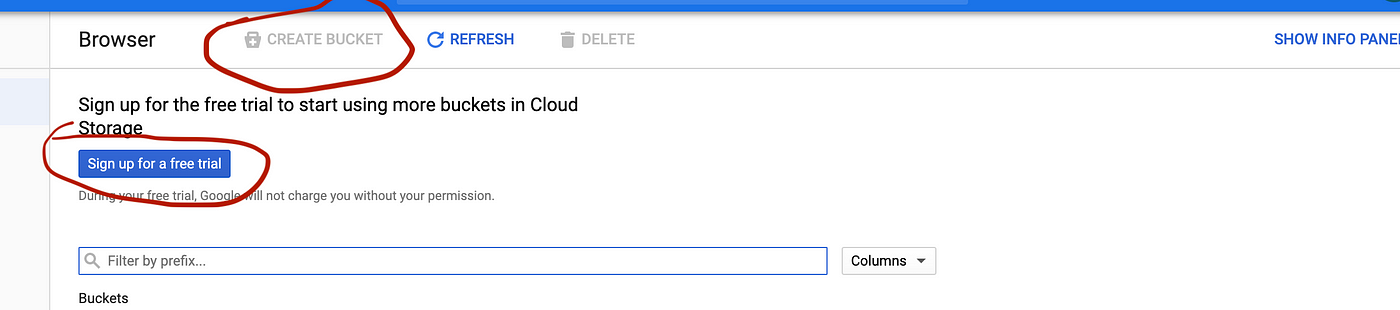
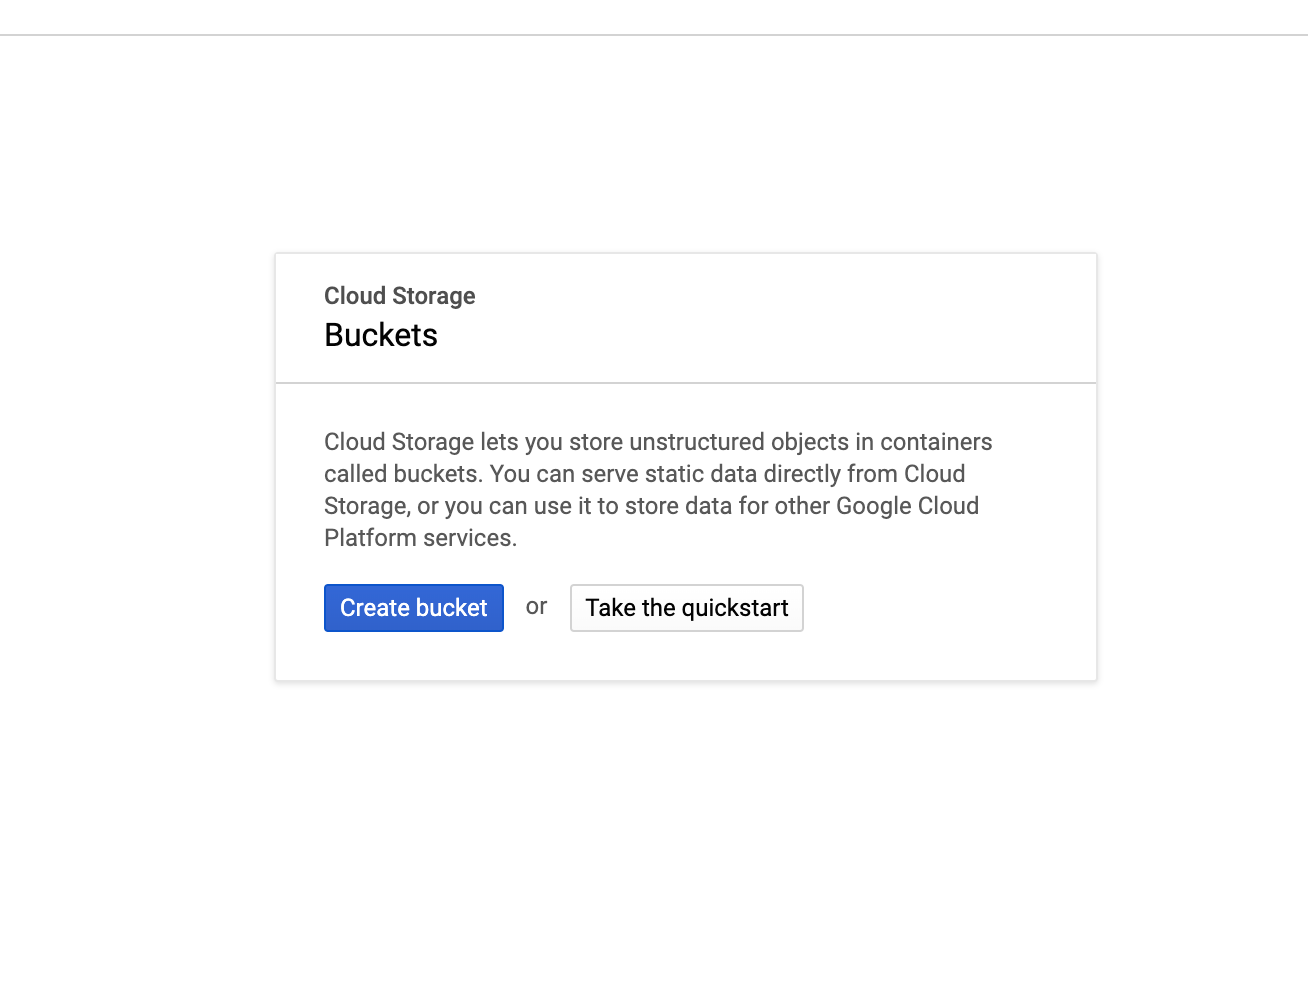
You'll find that the "Create Bucket" button isn't active, and also at that place is a button that is asking us to "Signup for free". Click on the "Sign Up Button" and fill all the necessary information. You might also be asked to enter your Credit/Debit Bill of fare Details earlier you tin can be able to complete the "Sign Up practise".
Afterwards you are done, the "Create Bucket" push should be active, click on it, you should meet a modal like to what nosotros have below.
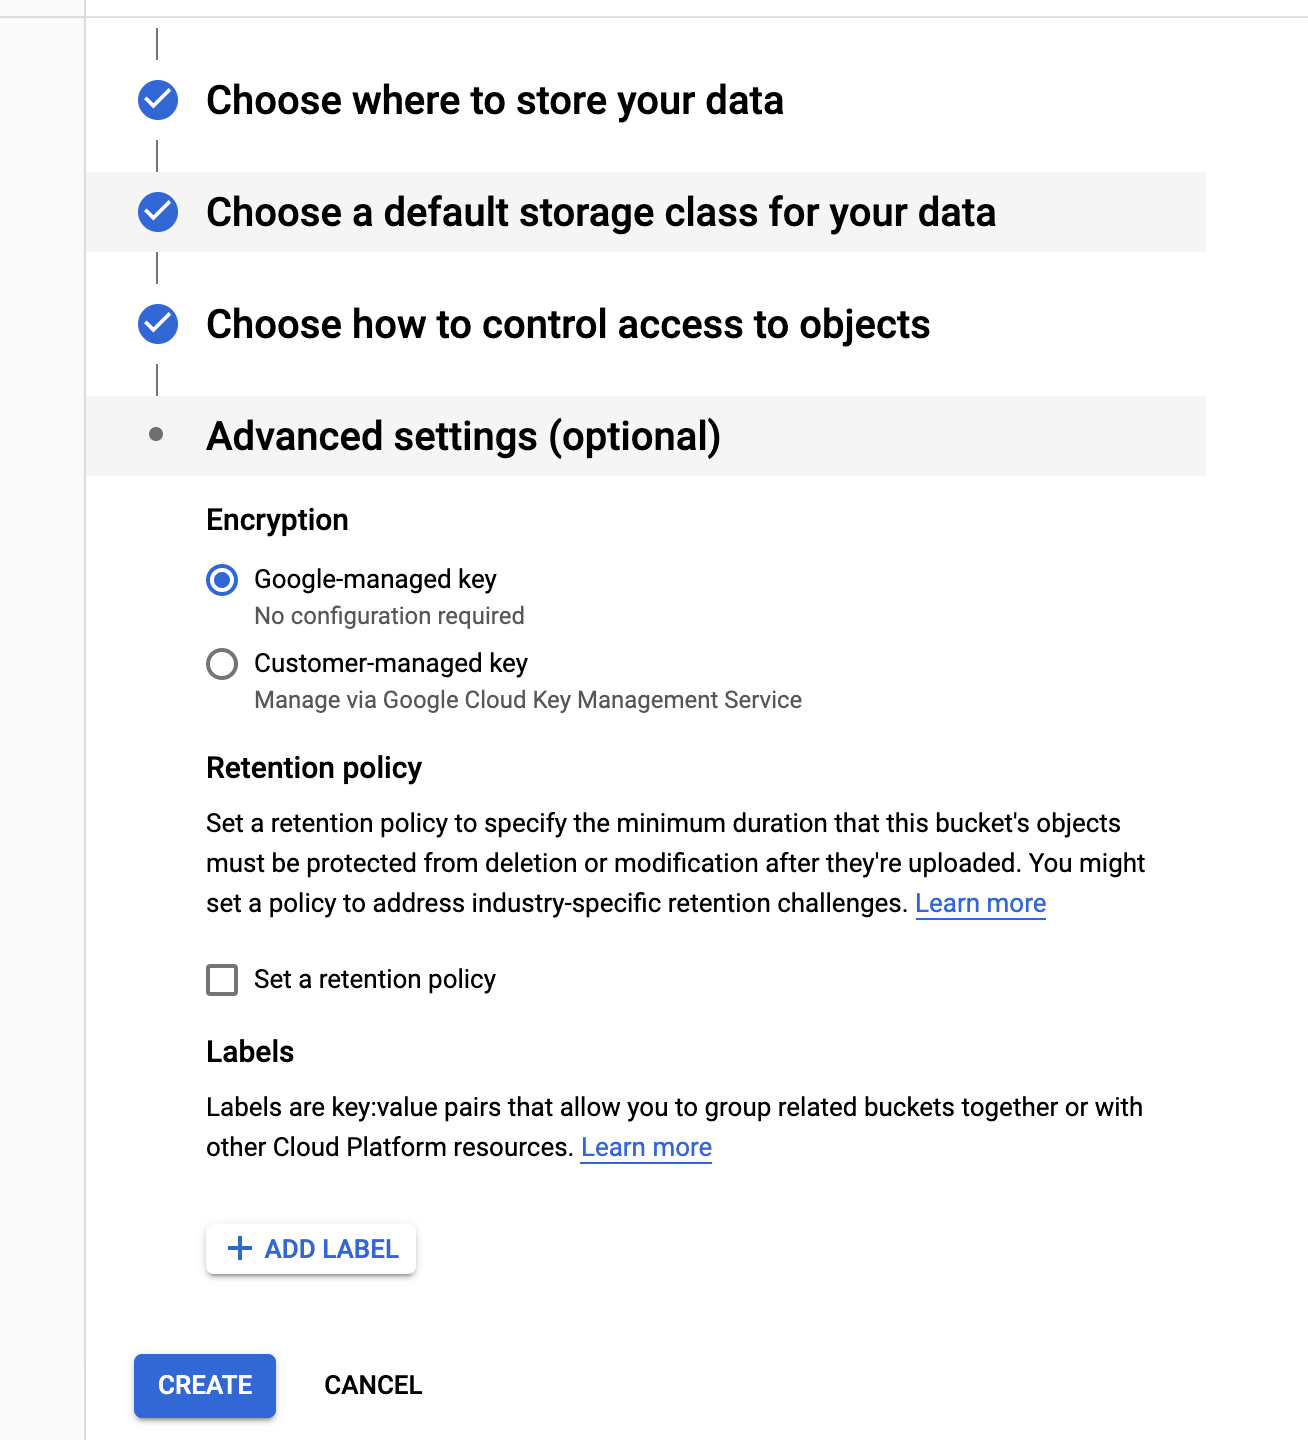
If not, but give your saucepan a proper name. Then, keep hitting the continue button until you get to the last select box. Finally, click on the create push.
Subsequently, completing the clicking practice, you should be redirected to a page similar to what we have beneath.

Click on the create button to finally create a Bucket. A Saucepan is basically a identify on the cloud where all of your data are being stored. According to the Google Cloud documentation, a Bucket is said to be a "Container that holds your data." To read more than about Buckets visit the link below.
https://deject.google.com/storage/docs/key-terms That being washed, we can now move to our development environs and start writing some code!
Setting Up The Development Surround
To prepare your dev environment for this little project, open up your last or panel and type in the commands below.
mkdir uploadit && cd uploadit if you are using Visual Studio Code as your Lawmaking Editor you can blazon the command beneath after the initial ones to open up up the Editor.
lawmaking . Once y'all are in your directory and take confirmed, type in the command below to initialize your project.
npm init --y The command below is frequently used whenever a new project is to exist started in Node.js. This allows u.s. to keep rail of all install dependencies when take used in developing the project. The result of running the command is shown below. A json file with some meta-data near our projection.
          {
            "proper name": "uploadit",
            "version": "1.0.0",
            "description": "",
            "main": "index.js",
            "scripts": {
            "test": "echo \"Error: no examination specified\" && exit ane"
            },
            "keywords": [],
            "writer": "",
            "license": "ISC"
}
The side by side thing we need to practise is to install all necessary dependencies our app needs for it to function. In your concluding, enter the command below to install a couple of dependencies we demand to showtime our app's server.
npm i express body-parser multer We need express for creating a server that is going to power our application, trunk-parser for parsing requests whenever it hits our server, and multer for parsing files which must have been part of the request object.
After successfully completing the activeness, a node_modules directory is beingness included in your project directory. This folder contains all the dependencies our awarding needs for it to be able to run.
Creating A Server
After you are done, in your root directory create a file and name it alphabetize.js . This is where nosotros are going to put the lawmaking which is going to create a server for our application. At this rate, your application's project structure should look similar to the picture beneath.
In your index.js file, paste the code below into it.
          const express = require('express')
const bodyParser = require('body-parser')
const multer = require('multer')          const app = express()          app.listen(9001, () => {
            console.log('app at present listening for requests!!!')
})
After yous're done with that, run the control below to beginning your server.
node index This would create a server that listens for requests on port 9001. To kill the process, click on ctrl + c at the same time.
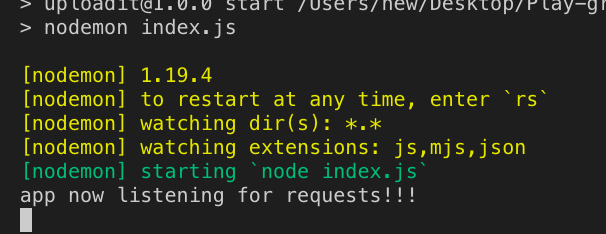
Starting our app with node directly would not be efficient as when we make changes to the app when nosotros accept to manually kill the server, and then restart before it tin be able to find any changes in our application. A solution to this trouble is to install nodemon which we can use to automatically start our project anytime nosotros brand a change to whatever file in our projection. To install it run the control below in your terminal.
npm i -D nodemon This installs it as a dev-dependency in the project. Now, go to your package.json file and change information technology's contents to what is in the snippet beneath.
Yous'll observe that in the script cardinal, a new set up of key-value pair has been added to it. Now, go to your concluding and run the command below to start your application server with nodemon.
npm run start You should see something similar to what we take below.
Setting Up A Service Account Central
At present that we have a server running, we tin now start making requests in order to push button an image or file into our bucket. Simply to exercise so, we need a dependency and also some certain credentials from our bucket to do so.
In your last , blazon in the control to install the google deject storage dependency which is going to help us with the paradigm upload.
npm i @google-cloud/storage Create a folder in the root of your project and name it assets. This is where we are going to put the files and images we want to push into our bucket. Once you are done with that, put a random picture in information technology and get dorsum to the GCP console. We need to create a service account key which gcs is going to apply to authorize us to put a file in our bucket.
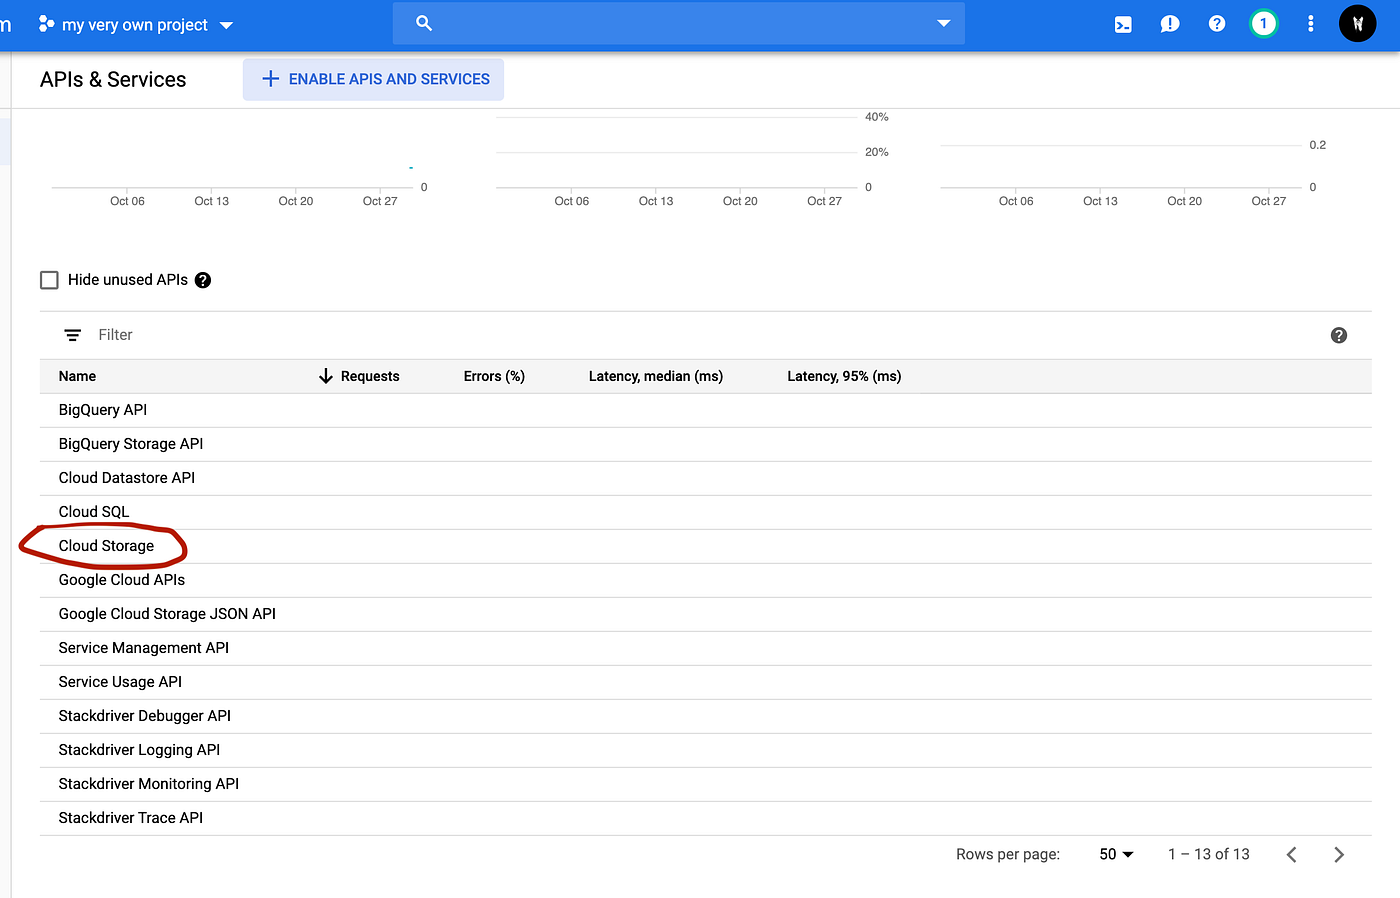
On the GCP console, search for API , click on the api & services selection. Y'all should be redirected to a new folio. Scroll down and click on the storage link
Afterward clicking on the link, y'all volition exist redirected to a new page. At the left section of the page, click on the credentials push button, later, click on the add credentials button as shown below.

Then, click on the service account selection. Fill in the forms and and then click on the create button as shown below.

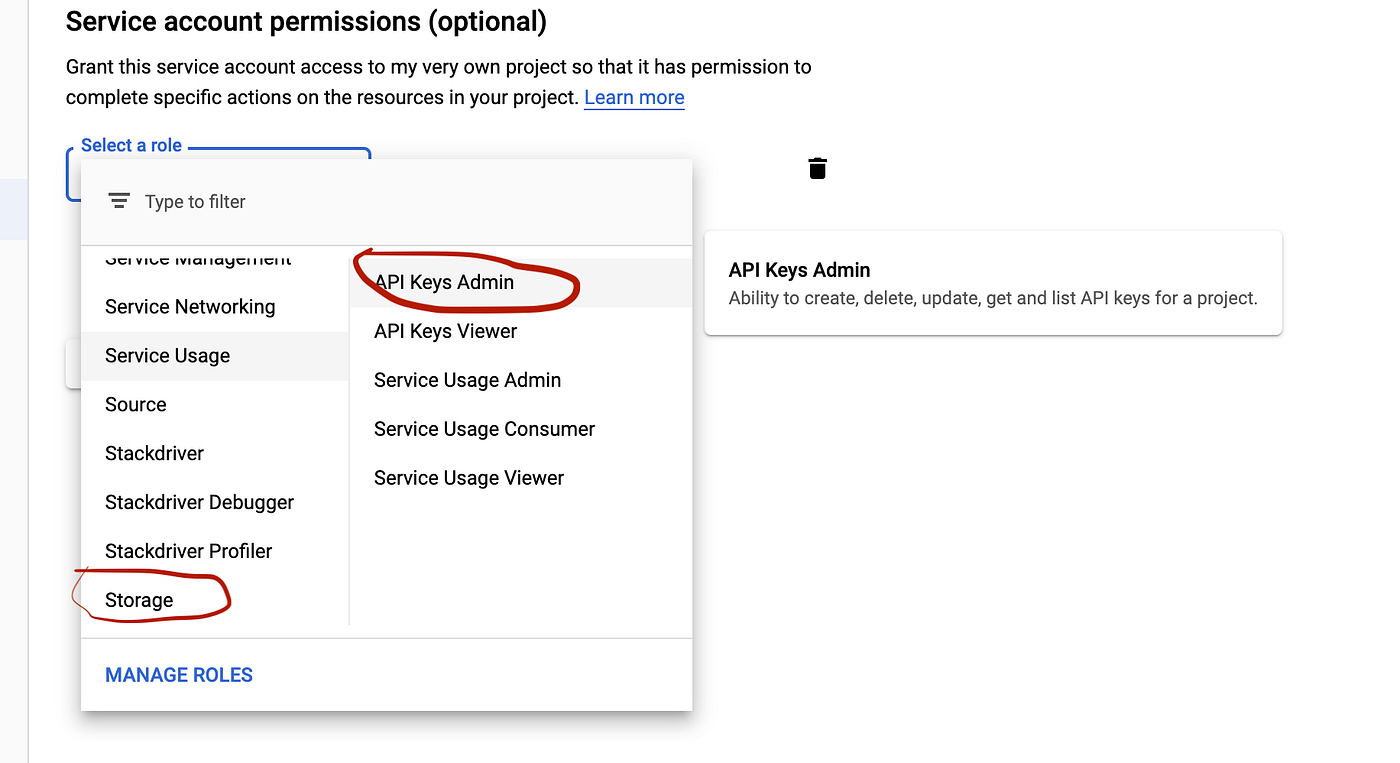
You should exist redirected to the create part section. Gyre down or search for storage. Select it and also select API KEYS ADMIN.
Once that's washed, yous are once again being redirected to some other page. Just click on the create key button every bit shown below.

Click on create
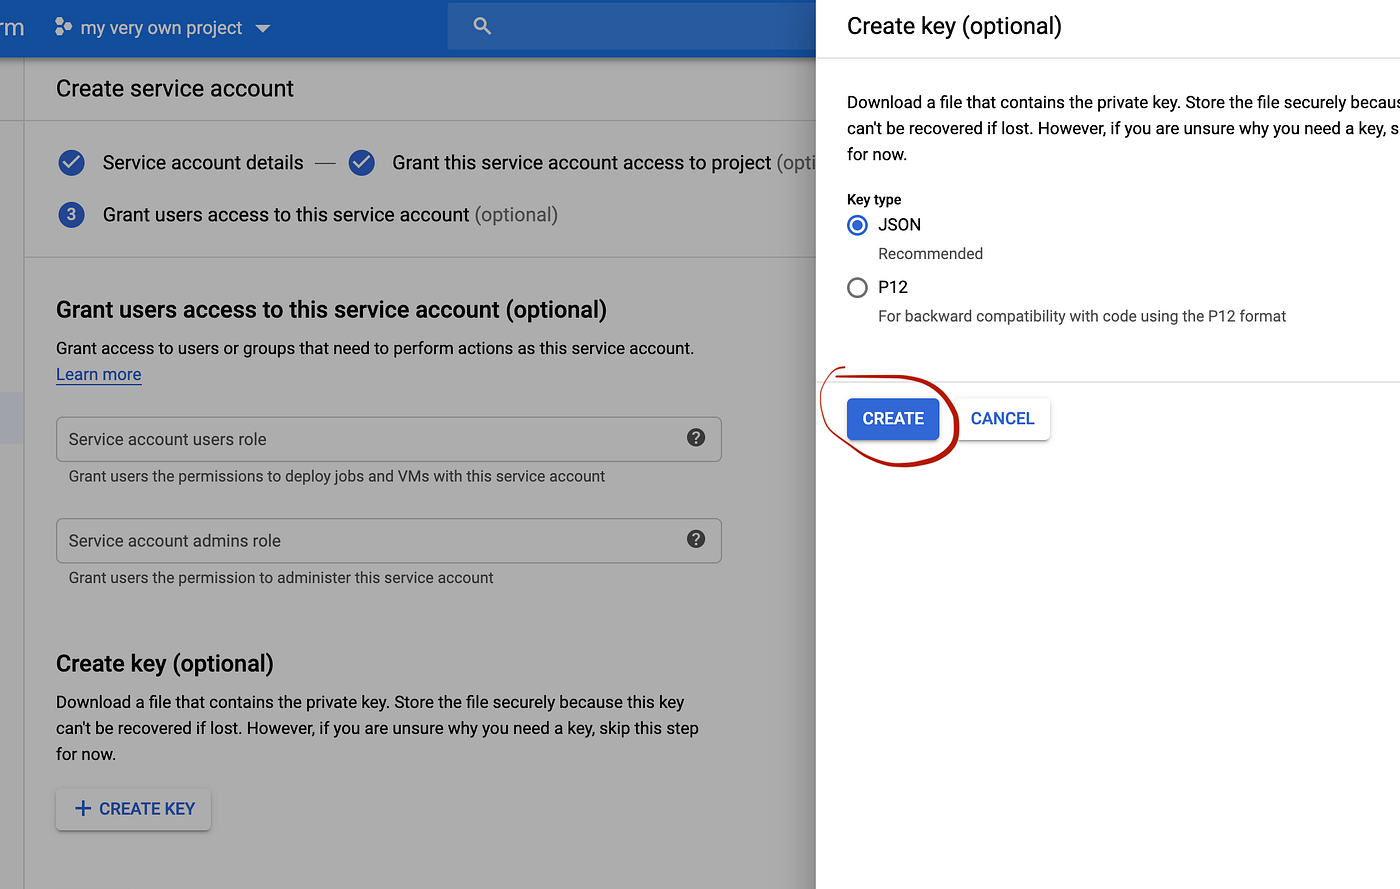
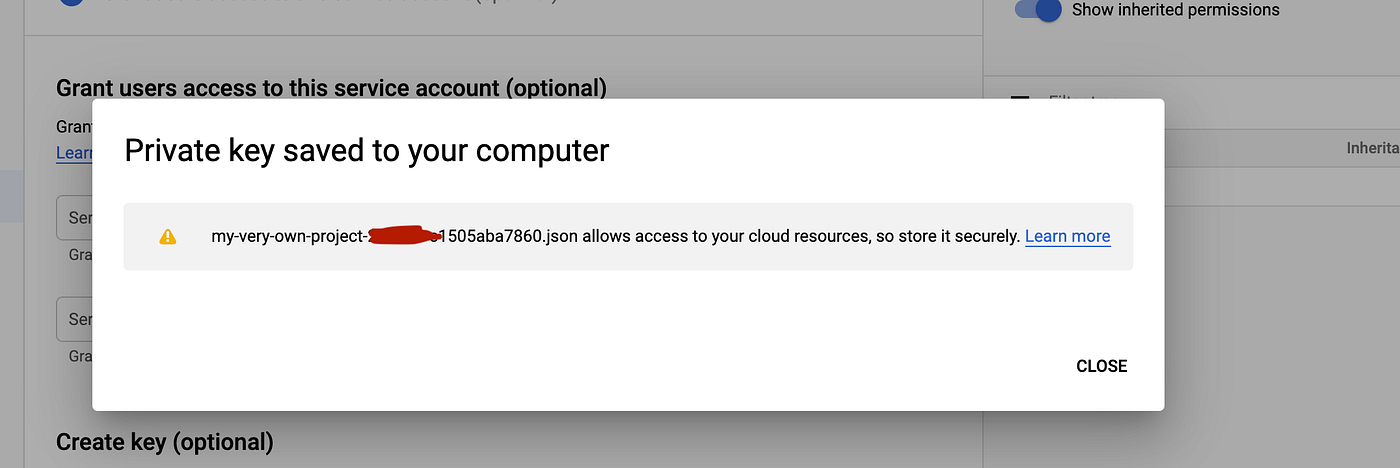
After it is being created, an automatic download of the business relationship key is being automatically downloaded. You need to keep this file very safe.
Going Deeper!
In the previous section, we created a service account primal and as well downloaded it on our auto. So, we need to make use of this file before we tin can be able to do anything. In your root directory create a binder and proper noun it config . Re-create and then paste the JSON file we downloaded into it. Also, in the config directory, create an index.js file and paste the code beneath into information technology.
What we have done here is basically a configuration of the @googale-cloud/storage dependency we installed before on in the projection.
After doing this we can now first with the core functionality of our application, which is image/file upload.
In the root directory create a folder and name it helpers. So, create a helpers.js file in it. We are going to use this file to create some helper functions that would aid us with the image upload. Withal, replace the index.js file in your root directory with the code snippet below.
Y'all'll notice that our app has changed. We actually haven't done anything much, all we have washed is just to use the other dependencies as a middleware in our application.
Go along to the helpers.js file and paste the code snippet into it.
What nosotros have done hither is to first import the @google-cloud/storage we initially configured and so we proceeded in linking it to our bucket. Afterwards, we created a function that returns a Promise. The office expects an object which contains the hulk object. Nosotros and then extracted the file name and the file ( buffer ) from the object. Nosotros clean it up, then, create a read stream. One time information technology is done writing the stream, information technology returns a URL to the prototype.
Once that is done, go back to your index.js file and replace the existing lawmaking with the code snippet beneath.
Open up POSTMAN, click on form-data, then, blazon file (it is important that the fundamental is named file since we already configured multer to take hold of our file in the files fundamental) under the key column, and select a random file on your arrangement so, finally, make a POST request to…
http://localhost:9001/uploads 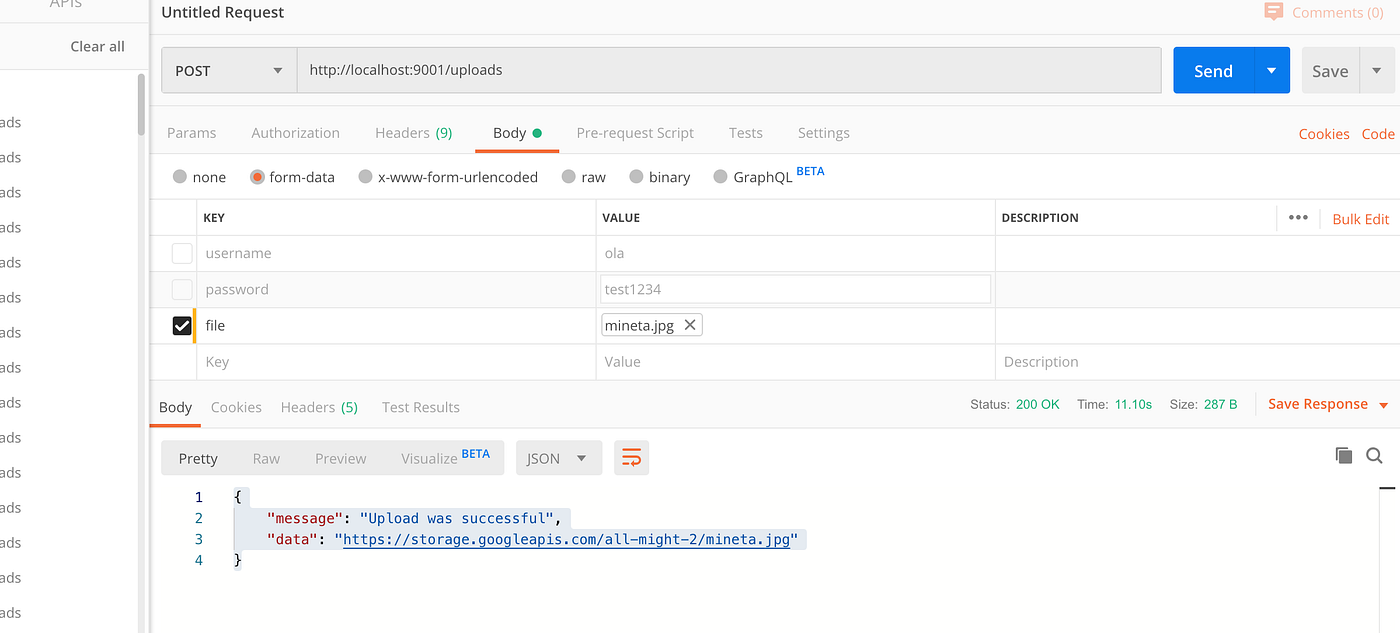
if that'southward successful, you should meet a link to the image.
Still, at this charge per unit, the epitome would not be publicly available. Yous need to go dorsum to the gcs console and edit permission of the file.
Go to permissions => Add together Members => storage object viewer.

Once that is complete, the file tin now be publicly available.

Conclusion
In this relatively short tutorial (lol) we tin see that gcs have made file upload easier. With few lines of code, you lot already have your file uploaded. It too has a very secure system for authorized users who can take access to the files in your bucket.
The application'south source lawmaking can exist found…
https://github.com/olamilekan000/uploadit Also, if you'd like to ask me further questions, feel free to hit me up on Twitter.
https://twitter.com/Principino__ To learn more than about gcs, check out the docs here
https://googleapis.dev/nodejs/storage/latest/index.html You can too attempt this awesome library for the file upload in case yous do not want to go through the stress of writing the code all over again.
https://world wide web.npmjs.com/packet/gcs-file-upload Arigato!
concepciondaree1968.blogspot.com
Source: https://medium.com/@olamilekan001/image-upload-with-google-cloud-storage-and-node-js-a1cf9baa1876
0 Response to "Html Taking in Image and Uploading Using App Engine"
Post a Comment